It’s official, Rivalry is now WideAngle. One of our big accomplishments last year was to move all of our web properties to SSL, including our main website. The warm fuzzies from having secure communication is great, but we recently uncovered a problem that we had not thought about when we launched the initiative. What do we do if we change our root domain?
In the “good ole days” of plaintext passwords and web requests open to the world, one would just add a listener to the webserver with a 301 redirect and be on their merry way. Of course this would no longer work for us since our Amazon ELB’s terminate all SSL. A visitor to https://rivalry.com would get the dreaded “This site is insecure” error since the ELB’s would be serving a certificate for WideAngle.com.
At first, we thought about leaving a single ELB and EC2 micro instance that would terminate the SSL and perform the correct redirect. I wasn’t trilled with this idea since it meant one more server class to maintain, add to chef, and monitor. After a little more digging, and some trial and error, I found that we could use S3 with Cloudfront to accomplish the same goals without having to spin up any additional severs. Since this information was spread out through a collection of different documents and pages, I’ve decided to create a definitive guide to setup SSL domain redirection using S3 and CloudFront.
Step 1: Setup the S3 bucket
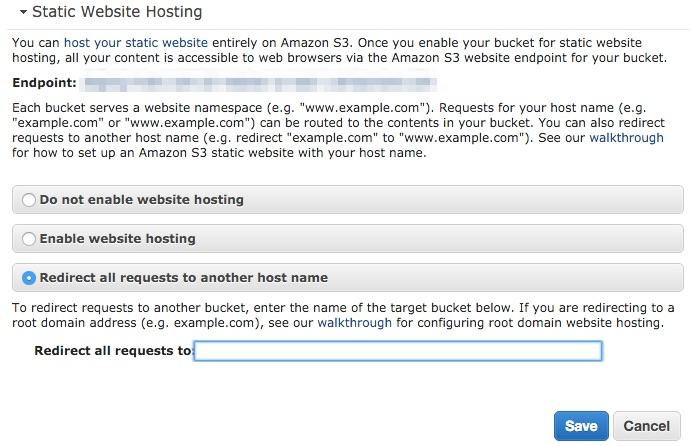
Amazon’s added a lot of support for hosting a static site with S3. One feature they have is an option to issue a 301 redirect to another domain.

Redirect all requests to the static site to another domain
I believe that since the eventual public endpoint of this bucket will be Cloudfront you can use any bucket name you want. However, I stuck with using the Fully Qualified Domain Name as the bucket name.
Step 2: Upload the SSL Certificate
We use Amazon’s ELBs to terminate our SSL connections and therefore have our SSL certificates available in AWS. However, Cloudfront cannot read those certs and they will have to be re uploaded specifically for use by Cloudfront using the AWS CLI.
You should have the privatekey.pem accessible from when you created the certificate request. The public_key_certificate_file and certificate_chain_file will have come from your SSL certificate vendor.
The command to upload a cert is the following:
aws iam upload-server-certificate --server-certificate-name CertificateName \
      --certificate-body file://public_key_certificate_file \
      --private-key file://privatekey.pem \
      --certificate-chain file://certificate_chain_file \
      --path /cloudfront/path/
The path option is critical if you want this certificate to be available to your CloudFront endpoint.
Step 3: Create a Cloudfront Endpoint
This is the most involved step in the entire process.

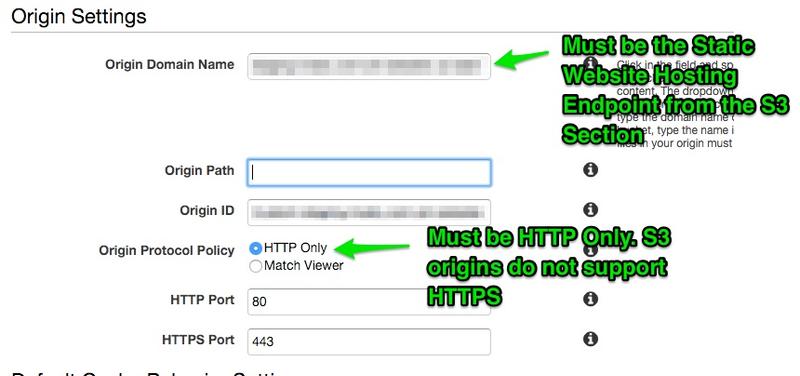
Setting up the Origin
Setting up the origin comes with a few potential pitfalls. The first is the Origin Domain Name. If you focus this field, you will see a drop down of potential options, include the bucket name that you created in step 1. Do not use this bucket name, you will instead have to use the endpoint from the static website section. The other gotcha is to leave the Origin Protocol Policy as HTTP Only. This option appears after setting the Origin Domain Name and must be HTTP Only since S3 will only respond to HTTP requests. Getting these two wrong will lead either to 403 Permission Denied or 502 Bad gateway errors.

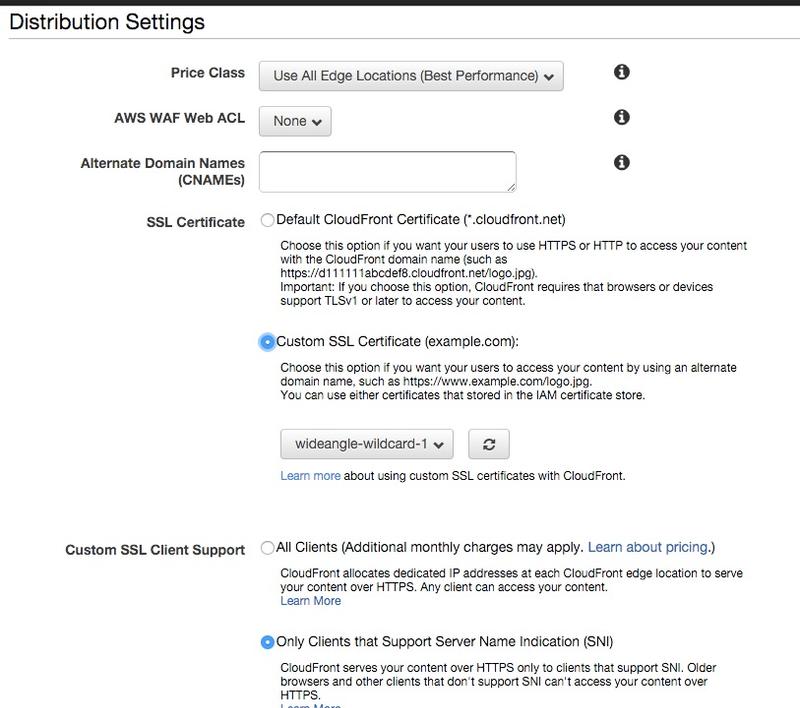
Configuring the Distribution
Under the section for setting up the distribution, you will need to set the Alternative Domain Names to the domain name that you would like to redirect from. Then you can set the Custom SSL Certificate to the certificate you uploaded in Step 2. This will enable all request to the CNAME to be served with your SSL requests. Finally, unless you would like to incur significant additional monthly costs, you should leave the “Only Clients that Support Server Name Indication” checked. This feature is supported by every major modern browser and allows SSL to be served in the absence of a fixed, dedicated IP address.
The only other option you might want to set is Forward Query Strings.
Step 4: Configure Route 53 (or other DNS Service)
The final step is to remap the domain name from the server to the new CloudFront distribution. If you are using Route 53, this takes the form of an A record alias to the distribution endpoint and your CloudFront distribution will show up as an alias target.
Conclusion
After completing these four steps and with CloudFront fully deployed, your old domain should redirect to the new with both HTTP and HTTPS and without any insecure domain errors, all without spinning up additional servers to configure and maintain.
I hope this guide was useful and prevented you from pulling out as much hair as I did through this process.
Resources
- Amazon’s guide for Using an HTTPS Connection to Access Your Objects
- AWS CLI home page
- Adrian Holovaty’s guide for using S3 to redirect domains
Did you like this content?
Related Posts:
WordPress, Apache, ELB, SSL
The magic steps to get fully ELB terminated SSL WordPress site on Apache
Using Foscam cameras to Watch the Baby
Our baby monitoring rig
Small Steps to Diversity in a Tech Startup
Technology startups benefit from teams constructed with wide ranging experiences and backgrounds
